istio资源类型
| 类型 | 作用 |
|---|---|
| Virtual Services | 虚拟服务:本质是一个配置片段,用来描述envoy策略 |
| Destination rules | 目的规则:对vs的流量进行进一步的精细配置 |
| Gateways | 网关:网关描述了一个负载均衡器,该负载均衡器在网格的边缘接收传入或传出的 HTTP/TCP 连接。 |
| Service entries | 服务实体:注册外部服务,如mongodb mysql这些到网格中 |
| Sidecars | 车边:单个网格的代理 |
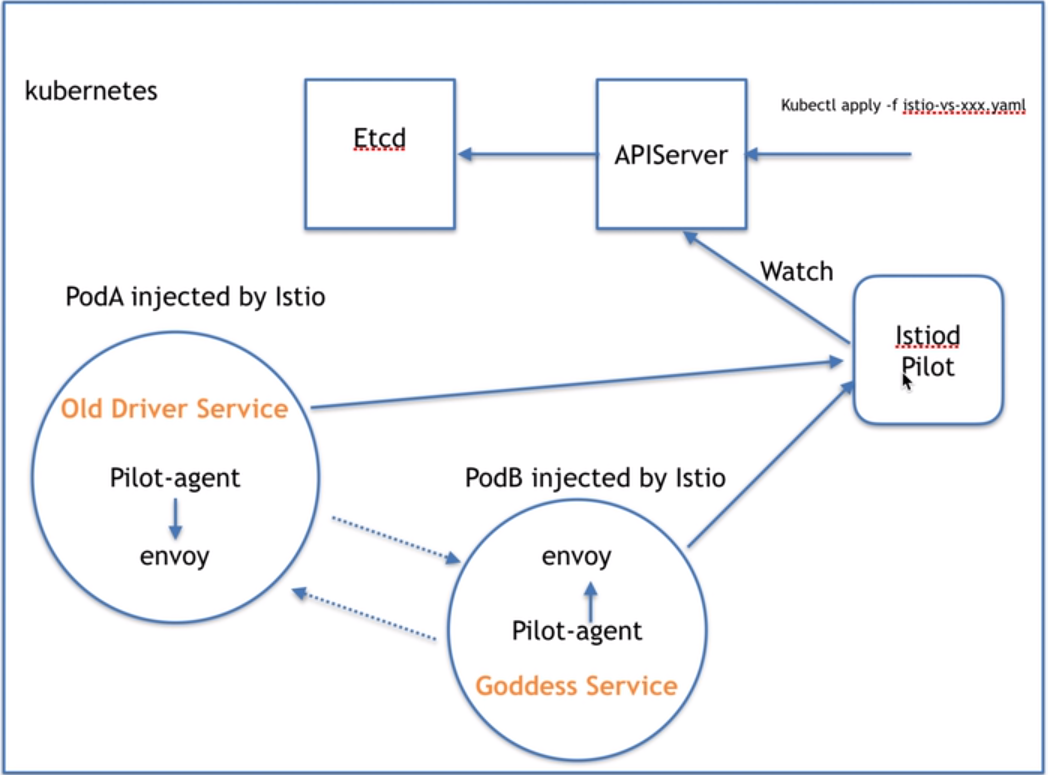
流量控制流程
其实是通过pilot对envoy这个代理进行控制,以达到流量控制的目的
下面列举几个场景
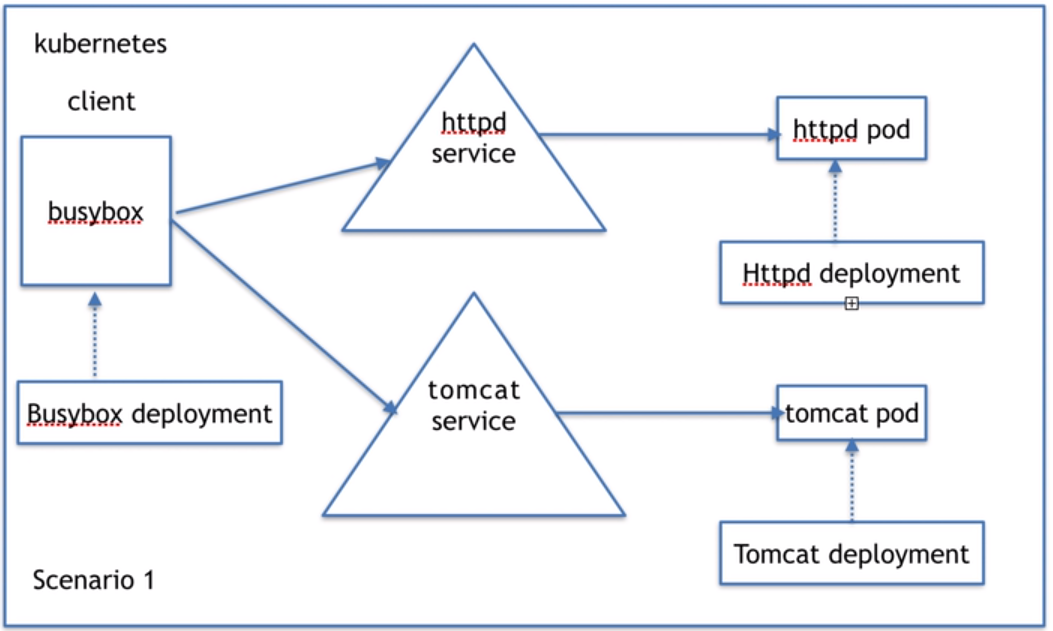
client端直接通过代码硬编码的方式去访问一个服务,这个服务有两个不一样的服务器 (k8s可以做到)
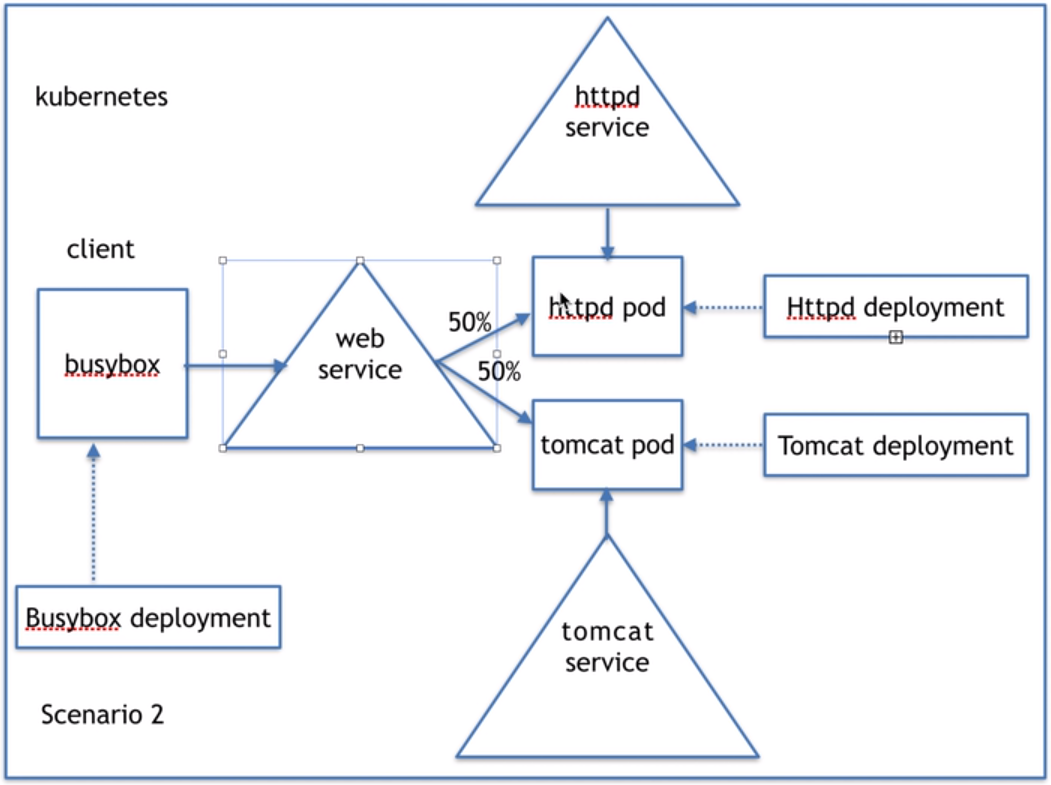
client端直接通通过负载均衡的方式去访问一个服务,这个服务有两个不一样的服务器 (k8s可以做到)
如果要进行详细规划k8s就做不到了
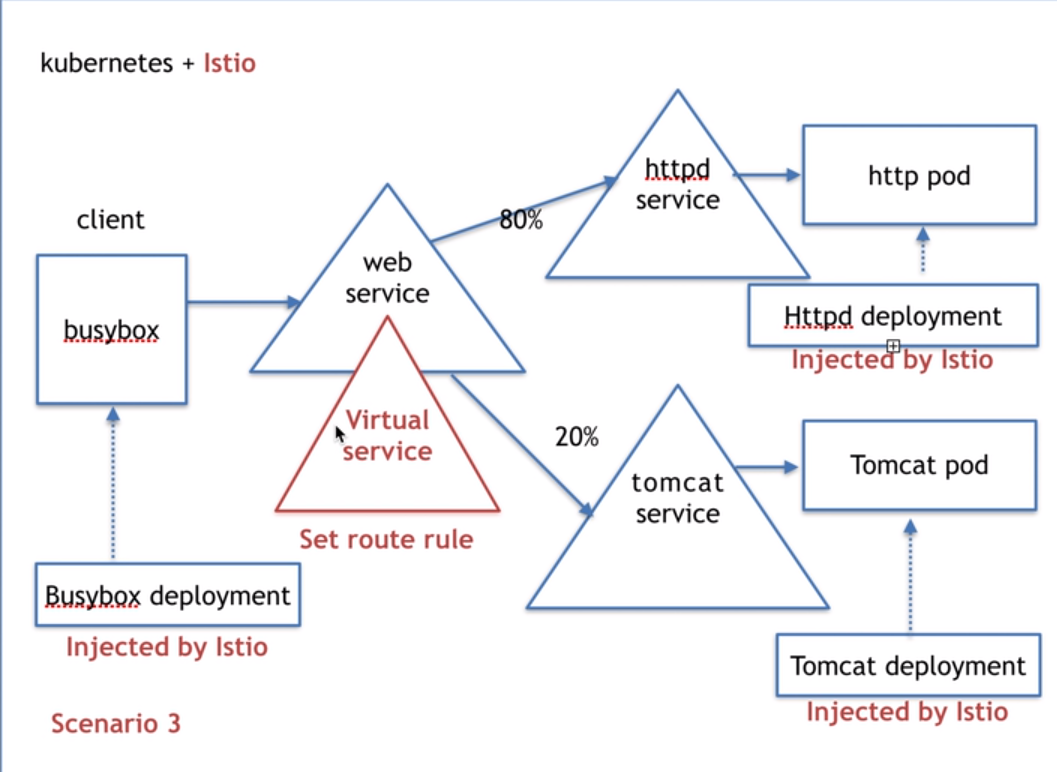
所以我们就需要virtual service
实战
场景1
client端
apiVersion: apps/v1
kind: Deployment
metadata:
  name: client
spec:
  selector:
    matchLabels:
      app: client
  template:
    metadata:
      labels:
        app: client
    spec:
      containers:
      - name: client
        image: busybox
        imagePullPolicy: IfNotPresent
        resources:
          limits:
            memory: "128Mi"
            cpu: "500m"
        command: ["/bin/sh","-c","sleep 3600"]
两个http服务
apiVersion: apps/v1
kind: Deployment
metadata:
  name: httpd
spec:
  selector:
    matchLabels:
      app: httpd
  template:
    metadata:
      labels:
        app: httpd
    spec:
      containers:
      - name: busybox
        image: busybox
        resources:
          limits:
            memory: "128Mi"
            cpu: "500m"
        command: ["/bin/sh","-c","echo 'hello httpd' > /var/www/index.html; httpd -f -p 8080 -h /var/www"]
---
apiVersion: apps/v1
kind: Deployment
metadata:
  name: httpd2
spec:
  selector:
    matchLabels:
      app: httpd2
  template:
    metadata:
      labels:
        app: httpd2
    spec:
      containers:
      - name: busybox
        image: busybox
        resources:
          limits:
            memory: "128Mi"
            cpu: "500m"
        command: ["/bin/sh","-c","echo 'hello httpd2' > /var/www/index.html; httpd -f -p 8080 -h /var/www"]
两个http服务的service
apiVersion: v1
kind: Service
metadata:
  name: httpd-svc
spec:
  selector:
    app: httpd
  ports:
  - port: 8080
    name: http
    targetPort: 8080
    protocol: TCP
---
apiVersion: v1
kind: Service
metadata:
  name: httpd2-svc
spec:
  selector:
    app: httpd2
  ports:
  - port: 8080
    name: http
    targetPort: 8080
    protocol: TCP
部署完了之后通过busybox就能访问到两个服务了
场景2
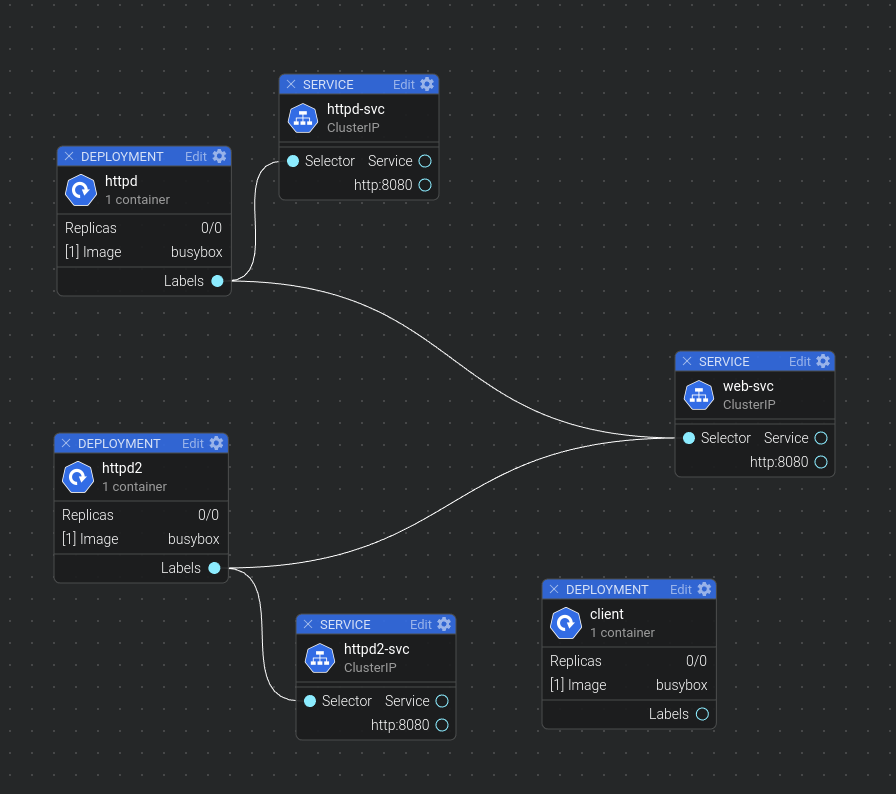
我们在服务定义的文件里面加入一个中间的service
apiVersion: v1
kind: Service
metadata:
  name: httpd-svc
spec:
  selector:
    server: httpd
  ports:
  - port: 8080
    name: http
    targetPort: 8080
    protocol: TCP
---
apiVersion: v1
kind: Service
metadata:
  name: httpd2-svc
spec:
  selector:
    server: httpd2
  ports:
  - port: 8080
    name: http
    targetPort: 8080
    protocol: TCP

---
apiVersion: v1
kind: Service
metadata:
  name: web-svc
spec:
  selector:
    app: web
  ports:
  - port: 8080
    name: http
    targetPort: 8080
    protocol: TCP
我们可以看到多了一个svc
➜  virtual-service git:(master) ✗ ks get svc -n lerko-virtual
NAME         TYPE        CLUSTER-IP      EXTERNAL-IP   PORT(S)    AGE
httpd-svc    ClusterIP   10.99.26.85     <none>        8080/TCP   2m21s
httpd2-svc   ClusterIP   10.109.39.32    <none>        8080/TCP   2m21s
web-svc      ClusterIP   10.110.44.188   <none>        8080/TCP   41s
同时我们直接访问10.110.44.188并且多次刷新就可以看到返回的数据是,httpd-svc和httpd2-svc两个服务器之间负载均衡返回的数据
场景3
如果要达到流量精确百分比控制的话就需要istio来进行控制了
apiVersion: networking.istio.io/v1alpha3
kind: VirtualService
metadata:
  name: web-svc-vs
spec:
  hosts:
  - web-svc # 这里是说明这个虚拟service要作用到web-svc上
  http:
  - route:
    - destination:
        host: httpd-svc
      weight: 80
    - destination:
        host: httpd2-svc
      weight: 20
应用之后我们可以通过这个命令看到新建的virtual-service
$ ks get virtualservices.networking.istio.io -n lerko-virtual
NAME         GATEWAYS   HOSTS       AGE
web-svc-vs              [web-svc]   53s
然后我们去client中去访问virtual-service(前提是pods已经注入istio) 我们多次进行访问的话就会发现大多数的流量是到了httpd上
➜  virtual-service git:(master) ✗ ks exec -it client-88cb688cc-4xk4k -n lerko-virtual -c client /bin/sh
kubectl exec [POD] [COMMAND] is DEPRECATED and will be removed in a future version. Use kubectl kubectl exec [POD] -- [COMMAND] instead.
/ # wget -q -O - web-svc:8080
hello httpd
/ # wget -q -O - web-svc:8080
hello httpd
/ # wget -q -O - web-svc:8080
hello httpd
/ # wget -q -O - web-svc:8080
hello httpd
/ # wget -q -O - web-svc:8080
hello httpd
/ # wget -q -O - web-svc:8080
hello httpd
/ # wget -q -O - web-svc:8080
hello httpd
/ # wget -q -O - web-svc:8080
hello httpd2
/ # wget -q -O - web-svc:8080
hello httpd2
/ # wget -q -O - web-svc:8080
hello httpd
/ # wget -q -O - web-svc:8080
hello httpd
/ # wget -q -O - web-svc:8080
hello httpd
/ # wget -q -O - web-svc:8080
hello httpd
/ #